Monday, June 30, 2008

Mood: ♥

What song u want to be played at your wedding?
Teitur: One and Only

I've been wishing on a star but I could never have imagined
I would land just where you are after all this lonesome traveling
Took one look in your eye, reach out to hold your hand
This is when I realized that I could never understand
Do you want to be my one and only love?
So you wanna be my friend, so you wanna be my lover
With you I do confess I can't be one without the other
That was hard for me to say, I hope I said it right
Which ever, come what may, you see I need to know tonight
Do you want to be my one and only love?
Do you want to play these cards, do you want to lay them down?
DO you want to run away or do you want o stick around?
Do you want to be my one and only love?

Sunday, June 29, 2008

Change Eye Color

Very simple and easy tutorial (++ fun). Can be used to apply makeups too!


Select the iris of the eye using the Polygonal Lasso Tool (L). Then go to Create new fill or adjustment layer at the bottom of the Layers palette, select Solid Color. Choose any color that you want. Change the Blending Mode to Color. And that's it! You can use the same steps to apply makeup but lower the Opacity. If you want to do the eyeliner, use Brush Tool (B) and apply Gaussian Blur (Filter > Blur > Gaussian Blur).

(a) Making selection

(b) Solid Color

(c) Changing Blending Mode

(d) Repeat same steps above to apply makeups


Before

After

_____________________________________________________________________
* i just love this photo. thanks xx--s-t-a-c-e-y--xx for letting me used her photo :)

Stunning Black & White

A very simple technique for a stunning black and white image.

1) Open your image. Then go to Create new fill or adjustment layer at the bottom of the Layers palette and select Channel Mixer. Tick the Monochrome box and use this settings below:

2) Next, go to Create new fill or adjustment layer again and select Gradient Map, click OK.

3) Copy the original layer by dragging it to the Create a new layer at the bottom of the palette. Change the Blending Mode to Soft Light and apply Gaussian Blur to your image (Filter > Blur > Gaussian Blur).

4) Flatten your image (Layer > Flatten Image) - Save, and there you go.

Before

After

____________________________________________________________________
* these beautiful photos are from: xx--s-t-a-c-e-y--xx, Sinned-angel-stock and preparethebodies

Thursday, June 26, 2008

Follow Your Dreams

______________________________________________________________________
* malam yang membosankan, terima kaseh Photoshop

Wednesday, June 25, 2008

Aku bukanlah seorang yang sombong

, mahupun berlagak pandai. The reason why most of my posts were written in English is because I'm comfortable writing in English. Tapi speaking, haram jadah aku fail kerana aku seorang yang fasih bertutur BM walaupun kadang-kadang tersasul BS (bahasa Sarawak). Hoho untuk menulis dalam BM memang aku lemah sikit. Mungkin sebab dulu cikgu BM aku pernah sumpah satu kelas fail BM kot (korang percaya tak dia sumpah kitorang semua tak masuk universiti). Satu jer aku nak cakap dengan cikgu aku tu, "In your face!" sebab aku lulus. Hehe ye, aku tau berdosa kutuk cikgu, tapi cikgu tu bermasalah. Berlagak sangat cakap students dia kat Semenanjung tu baik. Macamlah kitorang nie bodoh tak tau perangai students kat situ macam mana. Kencing jer lebey. Huh! Aku lebih suka cikgu BI aku. Walaupun kitorang hancuss BI takde pun dia nak kutuk-kutuk sampai sumpah kitorang fail. Dia ajar kitorang sampai betul-betul pandai. Kawan aku yang tak reti speaking langsung boleh speaking. Bukan macam cikgu BM tu, kitorang tak reti sikit, marah. Silap sikit, marah. Sebab tulah satu kelas boikot dia. Padan muka. -end of story-
______________________________________________________________________
* note to self: Cikgu BM aku = Melayu, Cikgu BI aku = India.
Bravo Melayu!

Hari Yang Bosan

Petang tadi aku try shoot HDR tapi tak berapa nak jadi. Bengong betol! Tripod aku pun macam haram. Belum pape dah loose. Takpelah, besok try lagi. Tak puas hati lagi, aku beli tripod baru. Huahua (kalau ada duitlah).

______________________________________________________________________

* aku, adik aku dan kucing aku pada hari yang membosankan

Tuesday, June 24, 2008

Spot The Difference


Tak banyak pun satu jer. Gambar nie lecturer aku reject. Dia suruh aku shoot balik model sama pose sama. Tapi disebabkan deadline yang dekat, model aku pun tak free, aku pun malas nak shoot balik sebenarnya hehe dan tadaa..! Photoshop sudah.

Bunga

Kenapa perempuan suka bunga?

____________________________________________________________________

* catatan hari yang membosankan

Monday, June 23, 2008

Subject aku untuk sem depan

Gila kentang! Ada ATH lagi? What the frig??

:sorry:

Street Shooting (with camera) 101

Note to self: aku bukanlah seorang yang expert tapi sekadar nak berkongsi pengalaman dengan sesiapa saja yang berminat. Kalau salah, betulkan. Kalau ada penambahan, tambah saja.

1. Kalau nak shoot street photography ni, pertama sekali yang korang kena ada adalah keberanian. Kalau tak berani jangan buat. Percentage untuk kena maki/kejar or what so ever yang berkaitan adalah tinggi. Jadi, kalau minat, tanamkan keberanian dalam diri anda. (p/s: For girls, pastikan jangan pergi shooting sorang-sorang. At least bawak sorang dua member.)

:okay:

2. Be invisible as possible. Yang ini untuk mengelakkan daripada sebarang kejadian yang tak diingini berlaku. Member aku pernah sekali hampir kena kejar dengan subjek yang dia nak shoot (masa tu dia buat tajuk 'Pengemis Kota' untuk subjek Photojournalism dia) - kalau kena situasi macam ni, satu cara yang paling mudah to save your ass (lol) ialah blah dari situ secepat yang mungkin. Tinggalkan subjek korang. Kalau sayang camera dan diri sendiri, jangan cuba jadi hero. Korang boleh shoot later on, or carik different angle yang mungkin subjek korang tak perasan korang ada kat situ untuk ambik gambar dia.

3. Sekiranya subjek terperasan korang ambik gambar, tapi korang tengok tak ada tanda-tanda dia nak marah or kejar korang, smiles - nod dan pergi dari situ. Itu kalau korang tak nak dia tanya soalan macam-macam kat koranglah. Kalau terlebih berani, korang approach subjek, bagitau dia tujuan korang ambik gambar and explainlah sikit apa korang buat.

4. Kalau korang rasa it's rude ambik gambar curi-curi, then approach subjek korang dan mintak kebenaran. Would I say this is a good move? Aku tak boleh nak bagi jawapan tepat sebab bergantung dengan korang sendiri. Tapi bagi aku, mostly people would say 'No'.

5. Hati-hati dengan camera korang. Kadang-kadang aku tengok budak-budak sekarang suka sangat gantung camera kat leher then berjalan ala-ala muka bangga ada SLR gitu. Takut aku tengok. Kalau korang shoot dengan compact camera biasa, then aku rasa tak ada apa-apa masalah. Kalau SLR camera, then hati-hati. If possible, lepas shoot simpan dalam beg sebab anything can happen kan? Nak shoot baru keluar camera. Setlah setting yang korang nak guna dulu supaya nak shoot nanti senang. Masa shooting tu, pastikan korang hold the camera by the grips and lilitkan tali camera tu kat tangan korang (kalau SLR).

6. Ni yang penting sekali. Bawak mineral water sebab nama pun dah street, mesti korang jalan jauh kan nak carik subjek-subjek best untuk di shoot. Nanti pengsan tengah-tengah jalan sapa nak tanggung? Huhu

7. Kalau korang nak shoot bangunan, pastikan dulu tempat tu tak ada security guard (aku pernah beberapa kali kena dengan guard ni). Kalau security guard tu cakap tak boleh then blah. Tak payahlah blah terus. Konon-konon pergilah dari situ tapi korang cariklah angle-angle yang guard tu tak nampak korang. Kalau kantoi jugak, jangan lari - photography is not a crime pun kan?

8. Satu cara paling senang nak mengelakkan orang tanya banyak kat korang is berlakonlah ala-ala tourist gitu.

9. Your shot is yours to keep. Defend that. Korang ada hak, end of story. Melainkan gambar yang korang shoot tu boleh memalukan dia (contoh: dia tengah korek hidung ke whatsoever lol) then dia ada hak untuk mintak gambar tu.

10. Lepas habis shooting, pergi makan. Nikmat wooo! Haha

(street shooting bersama Moonsyi)

That's all I can share so far kids. Kalau ada apa-apa penambahan, sila-silalah. Bagi korang yang minat photography, mulalah dengan compact camera biasa dulu. Tak semestinya photography kena pakai SLR terus. Perlahan-lahan kayuh. Kalau dah bersedia untuk beli SLR, then go on. Tapi kena ingat, some says, "photography is an expensive hobby". Jadi, sedia-sedialah duit untuk beli equipment-equipment lain. Takkan nak pakai basic kit jer kan sampai tua, mestilah nak upgrade jugak kan? (Aku pun tak upgrade lagi ni. Huhu) Harga equipment yang lain pun bukan murah. Lens dah RM400+ ke atas. Tapi, kalau minat tu dalam, teruskanlah cita-cita dan belilah SLR. Kalau setakat nak ambik gambar sendiri or gambar ntahapantah, batalkan saja niat tu. Buang duit jer beli SLR, compact camera sudah. Tak semestinya kau ada SLR, gambar kau the bomb (gambar aku pun banyak hampeh jugak w/pun aku pakai SLR haha) dan tak semestinya kau ada SLR kau cool or orang seni. Sudah-sudahlah mengejar trend dan ingin berada dalam kumpulan 'cool' people tu. Dorang bukan cool sangat pun. Till then, good luck and happy shooting (menggunakan camera =p)!

Saturday, June 21, 2008

Simple GIF

1. Open the images that you want to make GIF. Select Move Tool (press V) and drag the other image onto the image that you want for the base. Get rid of the other layer because you'll be working only with the base image.

2. Then, go to File > Edit in ImageReady or Shift + Ctrl + M or you can just simply click the button on the bottom of the Tools palette.

3. You will be transfer to Adobe ImageReady when you do that. As you can see in the image, you will have one layer on the Animation palette (Window > Animation). Close one eye from the Layer 1 layer, leaving the eye on the Background layer on (I forgot to rename the layers, sorry hehe).


4. Next, duplicate the current layer that you have on the Animation palette by dragging it to the Duplicate current frame (on the bottom right of the palette). Click back the eye on the Layer 1 layer. Select the delay time that you want for your GIF (0 - 10.0sec). Click the Play button on the bottom to see how it looks like. Go to File > Save Optimized. Save as type: Image Only (*gif) and basically you're done!


(Note: This simple GIF would be fun doing if you do the multiple shots from your camera.)


To all Skaters around the world


Wishing you Happy Go Skateboarding Day!

Wednesday, June 18, 2008

ATTN: ONLINE SHOPS/BOUTIQUES

Don't you just love capital letters? Lol anyway online shops/boutiques, I'm looking for outfit something like this:

(picture from: shopping princess, it's already sold out :<)
And also, I'm interested in cardigans (long and plain color esp) and hoodies too. So, if you sell any of those, please let me know yeah! Thanks :))

(p/s: Thanks Garde-Robe, I've just received my cardi!)
:dancepanda:

(update: skinny jeans too are welcome! hehe)

Way to go PTPTN!

Bayaran yuran pengajian anda akan dipotong melalui pinjaman PTPTN.

Harap maaf, anda dikehendaki membayar yuran sendiri. Kegagalan anda membayar dan mendaftar sebagai pelajar akan menyebabkan anda akan digugurtaraf selaras dengan peraturan akademik 2.3

Which one I should follow wacko? Good job on ruining my life. I almost got expelled last semester thanks to you! Gosh, fucking retarded.

Saturday, June 14, 2008

Coloring selected areas

As usual, when I'm bored, I will go 'sight-seeing' others' blogs. :devilishgrin: My favourite tutorial blog so far is blogmenjerit where it teaches you on how to pimp your blog. Lol nice one and i even got myself an emoticons there. Anyway, there's one post under photoshop label teaching you on how to color certain areas, or selected areas that you want. And today, I want to share with you some other ways to do that (maybe it's a bit difficult from blogmenjerit's tutorial but at least you know a few other alternative to do it). Ok, let's get started.

1) Introducing your new best-Photoshop Tools-friends, *drum rolls* the Magnetic Lasso Tool and Polygonal Lasso Tool. They're going to help you a lot in this. I personally love Polygonal Lasso Tool because even though it is hard for you to make a selected area but it's easier to handle. Magnetic Lasso Tool is more easier to make a selection because, like magnets, it will follows the selected areas that you want to make but if you didn't do it carefully, it will drag along unwanted areas. So be extra careful when using it.

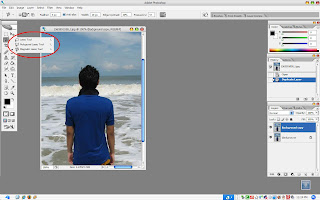
2) Make sure to zoom in closely when making selection of your image so that you won't dragging along any unwanted areas. And also, play with the Add to selection, Subtract from selection and Feather buttons (Add to selection as in to add area that you missed, Subtract from selection is to get rid of the areas that you don't want from the selected areas and Feather allows you to create a soft edge selection outline - of course you have to adjust the Pixels to create it).

3) When you're done, you will see a dancing ants around your selected image. Lol then go to Select > Inverse. Next go to Image > Adjustments > Desaturate or Shift + Ctrl + U for shortcut and there you have it, selected color area for your image.


4) Another way to do this is by using Edit in Quick Mask Mode in the Tools palette. Simply click the button or just press Q then choose Brush Tool (press B), and start brushing the area that you wanted in your image (you will have red color on your image when you do that). Adjust the sizes of the brush by pressing '[' for smaller size and ']' for bigger size. Remember, Eraser Tool (press E) is very useful when you're using this method.


5) After you finish brushing the area that you want, press 'Q' again to Edit in Standard Mode. You will have those dancing ants again :) As usual do the Inverse thingy and Desaturate and you will have the same result! (p/s: click the image for full size to see the 'ants' hehe)


6) Besides using Magnetic/Polygonal Lasso Tool and edit in Quick Mask Mode, you can also use Magic Wand Tool (or press W). It is a good tool if you know how to use it because it's extremely easy to make selection. Just adjust the Tolerance value (0 to 255) - the higher tolerance the larger your selection. Make sure the box of the Anti-Alias is checked to define a smooth edge to the selection. Then Inverse and Desaturate and that's it!


Before

After